The ideation step in the process is designed to introduce the community to the Indaba process, and to support them creating their stories that they will then record onto video later in the process.
The Indaba process includes spaces for group design exercises. You might already have established methods for scaffolding this process but if not, ours can be easily applied to most contexts.
Outcome of Step
Each group in the community you are working with should have a flip-chart sheet with 2-3 stories they want to tell, tagged in terms of key labels which relate to your aims.
1 hour
Familiarisation
Materials
Prompt materials (photos) to help the community contextualise what you are asking of them.
Working with the whole community, provide them with prompts about the issues they are talking about (e.g. photos from the project they are providing feedback for). Using the flip-chart paper, a scribe writes down the views of the community.
Options: Familiarisation
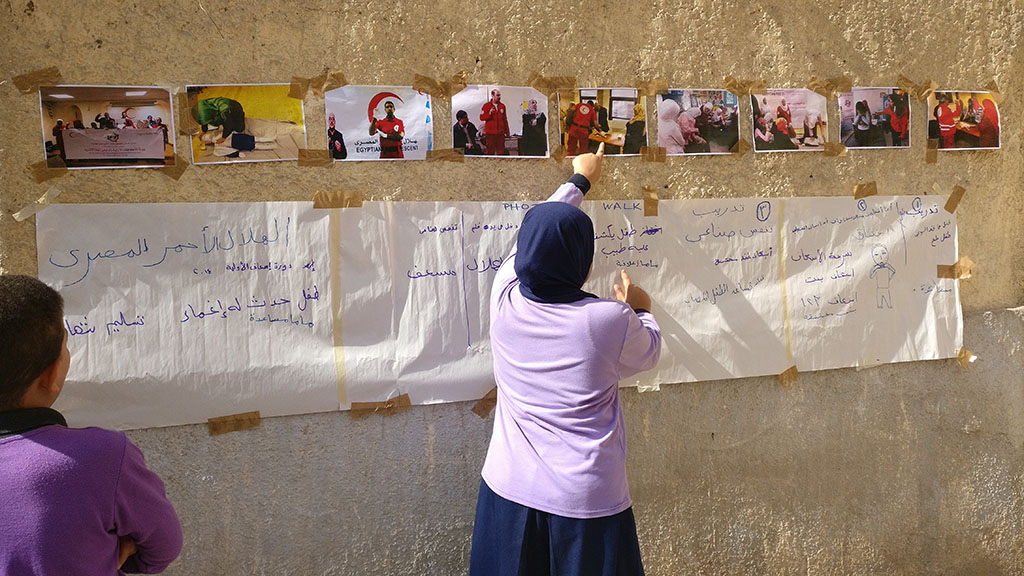
Example: Photo Walks
Start with a set of photos taken of the community before you arrived at various points in the project. Place these up in the space and get the community to walk around them and discuss amongst themselves what was happening around the time the photo was taken. Use these as discussion pointers to draw out a timeline of what has happened over the duration of the project and how it impacted the community.
Example of using Photo Walk technique for Familiarisation
30 mins
Group Selection
Indaba is designed to work within a community which is organised into smaller, representative groups. This grouping is context and project dependent. In line with the reporting process used across the organisation, we have used gender and age as primary groupings, thus groups may be; men, women, elderly and youth.
It is important to support the community self-selecting these groups, as well as making clear the time commitment required by participants to engage in the process.
1-2 hours
Scoping
Materials
Flip-chart Paper
Marker Pens
Story Cards
Scoping is an important part of the process, allowing the community to explore the key elements of their lived experience that would be valuable to share in the context of your deployment. Scoping can be performed in a variety of ways depending on the purpose of the participatory process, however the end result should always be a small set of stories that have the potential as rich narratives.
In most cases, the output of the scoping exercise is that each group has exhaustively listed any relevant narrative from their own lives represented in some way on flip-chart paper.
Options: Scoping Exercise
Option: Story-cards
Each group are given cards which help them think about key questions to answer for the project and then. Cards are selected based on reporting criteria for the project, and values related to the community. Groups write down responses to the cards on flip chart paper.
Option: Facilitated Discussion
Each group is facilitated in discussion about the issues raised in the previous activities and the impact on their own lives. They are encouraged to locate specific examples in their own or the communities lives. These are recording by a scribe for the group.
1-2 hours
Story Building
Materials
Flip-chart
Pens
Tag Stickers
Each group now selects and refines 2-3 stories based on their flip chart paper from the previous activity. As a first step they should write down a narrative account of the story as a group.
Go Deeper
During this activity you can use the following prompts to facilitate going deeper into each story:
Who: who is the issue about or affecting?
What: what is the issue?
Where: where is this happening?
When: the timeline for this issue.
Recommendation: what is your recommendation going forward?
Apply Tags
To maintain continuity for participants between different stages in the process, we encourage use of Stickers to tag each element of the story as it is represented on paper. These tags are used later to help capture these elements with video and create a story.
Sheet of Tag stickers used with groups to facilitate their narrative.